Getting Started
What DMXexpress is
DMXexpress is a native lighting controller with a built-in 3D visualizer. You patch
fixtures, build looks, run effects, record cues, and stream the result to the real
world over Art-Net. Everything happens in one window, and everything you build is
visible on the virtual stage as you build it.
The one big idea
You build a look in the Programmer, then store it into
something reusable — a Palette, a Preset, a Phaser, or a Cue. Playback runs
underneath the Programmer, so whatever you are editing always wins until you
clear it.
If you have read grandMA3 tutorials
DMXexpress is modelled on grandMA3 with friendlier names. Here is the translation:
| DMXexpress | grandMA3 | What it is |
|---|
| Programmer | Programmer | Your live scratch pad of values you are editing right now |
| Groups | Groups | Saved fixture selections |
| Palettes | Presets | Saved values for one feature (color, position, and so on) |
| Presets | Snapshots | A whole-rig look, stored straight from the Programmer |
| Phasers | Phasers / Effects | Moving, rolling effects built from channel components |
| Stacks | Sequences / Cue lists | An ordered list of looks you step through |
| Decks | Executors | The faders and Go buttons that play your stacks |
| Views | Views | Saved window layouts |
Suggested order of operations
Patch and Art-Net, then Groups, then Palettes (color and position first), then Phasers,
then Stacks to record cues, then Decks to play, then Views to save your layout.
Getting Started
Install and run
Grab a prebuilt release for Windows, macOS, or Linux from the
download page — no toolchain, installer, or companion
files needed. An Art-Net node is only required for live output; the visualizer
works with nothing else on the network.
Building from source instead
You need a current Rust toolchain and a GPU supported by wgpu.
Build and run
# run in development
cargo run

# optimized build
cargo build --release
./target/release/dmxpress

# run the tests
cargo test
First launch
- Launched outside a show directory, DMXexpress creates a per-user data folder and seeds it with the sample rigs and stage setups.
- Open Patch and add fixtures — search the built-in library, pick a built-in profile, or let a ShowBuddy patch load on macOS.
- Set Universe in the toolbar to your base universe. Slots 1–512 go there, slots 513–1024 to the next universe.
- Press ArtPoll to discover Art-Net devices, then pick a node in the Art-Net panel.
- Leave the Log window open while you learn — it narrates everything you do.
Network safety
DMXexpress transmits live lighting data. Confirm the selected interface, universe,
patch, and Grand Master before connecting it to a real rig.
Getting Started
The screen at a glance
One window, four fixed regions, and a set of floating windows you toggle from the top
toolbar. Every panel has its own small A- / A+ zoom stepper in
its corner, so you can size each area independently.
Top toolbar — Universe, ArtPoll, Freeze, Reload patch, and one chip per window
FixturesEvery patched fixture as a color tile. Click to select.
3D stage viewLive beams. Click, drag, and gizmo your rig.
Channel controlSliders for the current selection. This is the Programmer.
InspectorPresets, ShowBuddy banks, transform editor, setups.
Decks — Grand Master plus one strip per stack (when shown)
Command line (when shown)
Toolbar chips
Art-Net, Oscillator, Transition, Chases, Groups, Orders, Scenes, Palettes, Gobos,
Phasers, Beat, Audio, Stacks, Decks, Cmd, Views, Log, Patch, Configs, DMX, and
Settings. Each one shows or hides its window. Art-Net docks to the top, Decks and
Cmd dock to the bottom; the rest float.
Pop a window onto another monitor
Every floating window has a pop-out button in its header that moves it into its
own OS window — park Palettes and Phasers on a second screen and keep the stage
full-size. Closing the popped-out window docks it back.
Save the layouts you use
Build a programming layout and a playback layout, then store each one in
Views. Views capture the open windows and the stage camera.
Getting Started
The Programmer, and why Clear matters
This is the single concept that trips up every newcomer, so it gets its own page.
What the Programmer is
- It holds every channel you have touched since the last Clear.
- It is an overlay that sits on top of all playback. While a channel is in the Programmer, you control it, not the cues.
- Store copies the Programmer into a palette or cue. It does not clear it.
- Only active channels get stored, which is what makes cue tracking work.
How to release it
- Press Clear in the Palettes window, or Clear prog in the Stacks window.
- Or type
clear (or c) in the command line.
- Watch the
n programmer ch active readout drop to zero.
Golden rule
After you record cues, clear the Programmer. If your faders and Go button appear to
do nothing, it is almost always because the Programmer is still holding those channels.
Active-channel readouts
Both the Palettes window and the Stacks window show a live count of active Programmer
channels. Use it as your safety light: a non-zero count means playback is being
overridden somewhere.
Getting Started
Your first show
A complete run-through that produces a three-cue show. Assumes a few moving heads are
patched. Do this once and the rest of the guide will make sense.
A. Save a selection
- Select all your movers in the Fixtures panel or on the stage.
- Open Groups, type
Movers, press Store.
B. Build palettes
- With
Movers selected, dial full blue in Channel control.
- Open Palettes, pick the Color tab, type
Blue, press Store Color.
- Dial red, store it as
Red.
- Point the movers at the crowd with Pan and Tilt, switch to the Position tab, store it as
Audience.
- Point them center stage and store
Center.
C. Record three cues
- Open Stacks, press New, name the stack
Main.
- Recall the
Movers group, click Blue, click Center, set Dimmer to full.
- Set Fade to 3 seconds and press Store cue. That is cue 1.
- Click
Red, click Audience, press Store cue. That is cue 2.
- Open Phasers, add a
PAN component, press Apply, return to Stacks and press Store cue. That is cue 3.
D. Play it
- Press Clear prog. This step is not optional.
- Open Decks, push the
Main fader up.
- Press Go to step through cues 1, 2, and 3, each fading over its time.
- Pull GM down to dim the whole rig.
It is already saved
Groups, palettes, phasers, stacks, and views are written to disk automatically.
Reopen DMXexpress and your show is still there.
Rig & Stage · Patch
Patch
Adds fixtures from the built-in fixture library or the
hand-written DMXexpress profiles, on top of (or instead of) a ShowBuddy patch.
This is where your rig is defined in DMX terms.
How to patch a fixture
- Open Patch from the toolbar.
- Search the Fixture library by name and maker — 2,200+ models — or pick one of the Built-in profiles from the dropdown. The line underneath reports the channel count and pan/tilt range of whatever is selected.
- Type a Name, set the Address (1–1024) and a Count (1–32).
- Press Add. Addresses advance automatically and multiples get numbered suffixes.
Managing what is in the rig
| Control | What it does |
|---|
| Include ShowBuddy patch | Untick to work with a DMXexpress-only rig. ShowBuddy preset banks are hidden too, and everything returns when you re-tick it. |
| DMXexpress fixtures | Fixtures you patched here. The cross button unpatches one. |
| ShowBuddy fixtures | Fixtures from the imported patch. The cross button removes one from the rig, but it stays restorable. |
| Removed / Restore all | Brings excluded fixtures back into the rig. |
| Reload ShowBuddy patch | Top toolbar button. Press it after editing the patch in ShowBuddy. |
Address 513 and up
Slots 1–512 go to the base universe set in the toolbar. Slots 513–1024 go to
the next universe up. A fixture that would run past slot 1024 is rejected and the
reason is written to the Log.
Rig & Stage · Fixture library
The fixture library
DMXexpress ships with a built-in library of over 2,200 fixture models — 7,400+
patchable modes from 209 manufacturers — so most rigs patch without writing a
single profile.
Where it comes from
The library is compiled from three open sources, merged so the best data wins:
| Source | What it contributes |
|---|
| Open Fixture Library | The most precise channel data. It wins wherever sources overlap. |
| QLC+ | Models and alternate channel-count modes OFL doesn't carry. |
| GDTF Share | Manufacturers' own data for the current professional ranges. |
Every mode is flattened into its own entry with the channel list already in address
order, and every channel's role is resolved from the source's own capability data
rather than guessed from its name.
How to patch from it
- Open Patch from the toolbar.
- Type into Search under Fixture library — try
chauvet spot — and optionally narrow the maker dropdown.
- Click a result. Each row is one channel mode of one model, with its details in the subtitle.
- Set Name, Address, and Count, then press Add, exactly as with a built-in profile.
Loaded only when needed
Uncompressed the library is about 14 MB of JSON, so it ships gzipped and nothing
loads until the first search in the Patch window. After that it stays cached.
When a fixture is missing
Hand-written profiles cover anything the converters can't reach — the repository's
FIXTURES.md documents the profile format, the channel helpers, and how
to rebuild the library from the upstream sources with tools/build_library.py.
Rig & Stage · Fixtures panel
Fixtures panel
The left rail. One tile per patched fixture, filled with that fixture's live output
color, so the panel doubles as an at-a-glance rig monitor.
Reading a tile
- Top-left text is the fixture name, truncated to fit.
- Bottom-left text is its DMX start address.
- The fill is the fixture's current output color; text flips to black on bright fills.
- A thick blue outline means selected.
- Hovering shows the full name, the DMX range, and the channel count.
Selection modifiers
| Action | Result |
|---|
| Click | Select just this fixture, replacing the current selection |
| Shift-click | Add or remove this fixture from the selection |
| Cmd-click (Ctrl on Linux) | Select every fixture of the same type |
Sizing the grid
Use the A- / A+ stepper in the panel header to shrink the
tiles when you have a big rig, or enlarge them for touch use.
Rig & Stage · 3D stage view
3D stage view
The upper half of the center panel. It is both your pre-visualization tool and your
programming feedback loop: select fixtures on stage, drag them into position, and watch
volumetric beams respond live.
Camera
| Mode | Controls |
|---|
| Orbit (default) | Right-drag or Alt-left-drag to orbit, middle-drag to pan, scroll to zoom. |
| Free fly | Right-drag to look, W A S D to move, Space up, Shift down, arrow keys to look, scroll to change fly speed. |
Switch modes with the Orbit / Free fly toggle at the top of the Inspector.
Selecting on stage
- Click a light to select it; click empty space to clear.
- Shift-click to toggle a light in or out of the selection.
- Cmd-click to grab every fixture of that type.
- Shift-drag across empty space for a marquee selection.
Moving things
- Drag a light to slide it across the floor plane.
- Hold Cmd while dragging to change its height instead.
- Drag a light near the blue ring of a tower or truss slot to snap it on; drag it away to detach.
- Grab a gizmo arrow to move the whole selection along one axis, or a gizmo ring to rotate it around the selection centroid.
- Drag the stage box edge arrows to resize the stage itself.
Keyboard (with the stage hovered)
| Key | Action |
|---|
| Cmd-Z | Undo the last stage edit |
| Cmd-D | Duplicate the selection |
| Backspace or Delete | Delete the selected copies, or the selected tower when nothing is selected |
Rig & Stage · Trusses & towers
Trusses and towers
Real mounting structures for the 3D stage: floor-stand towers, F34-style straight
box-truss runs, and curved radius truss — all with snap-on light slots, so the
virtual rig hangs the way the real one will.
The three structures
| Structure | What it is |
|---|
| Tower | A floor stand with one crossbar and eight light slots — four top, four bottom. |
| F34 truss | A straight box-truss run with mount slots spaced every half metre along the top and bottom chords. |
| Radius truss | A curved segment sweeping an arc. Set the radius and arc angle and the slots follow the curve, aimed along the tangent. |
How to rig one
- At the bottom of the Inspector, press Add tower, F34 truss, or Radius truss.
- Drag lights near the blue rings to snap them onto slots; drag them away to detach.
- Click the structure with no lights selected to open its editor in the Inspector.
- Edit X, Z, and Height numerically. Straight truss gets Length and Heading; radius truss gets Radius, Arc, and Start angle.
- Pitch tilts the whole run out of the horizontal plane, and Roll sets which way a pitched truss faces.
- Press Delete truss (or Delete tower) to remove one.
Mounted lights travel with the structure
Move or rotate a truss and every snapped light swings with it, keeping its slot.
Editing a light's own X, Y, or Z detaches it; rotating the light does not.
Setups remember structures
The Inspector's Setups section saves and reloads the whole physical
arrangement — light placement, towers, and truss — so a rig you build once can move
between shows.
Rig & Stage · Inspector
Inspector
The right rail. Below the Presets and ShowBuddy sections sits the transform editor:
precise numeric control over whatever is selected on stage.
One light selected
You get its name and DMX range, its archetype, and a grid of X,
Y (height), Z, then either Base spin
for moving heads or Yaw and Pitch for fixed bodies,
plus Size and a Housing opacity slider for the
visualizer. Editing X, Y, or Z detaches the light from its tower; rotating does not.
Several lights selected
The grid becomes nudge controls: ΔX, ΔY,
ΔZ, a Size multiplier, and
ΔSpin, ΔYaw, ΔPitch.
Each drag applies its delta once to the whole selection and resets to zero.
Towers
- Press Add tower at the bottom of the panel. A tower is a floor stand with one crossbar and eight light slots. The F34 truss and Radius truss buttons beside it add straight and curved truss runs — see Trusses & towers.
- Drag lights near the blue rings to snap them on.
- Select the tower to edit its X, Z, Yaw, Height, and Width.
- Press Delete tower to remove it.
Other buttons
| Control | What it does |
|---|
| Duplicate | Copies the selection, same as Cmd-D on the stage. |
| Remove copy | Deletes a copy. The last copy of each fixture always stays. |
| Setups | A collapsing section: name an arrangement and press Save, then Load it later. Setups store light placement and towers only. |
| Reset light positions | Opens a confirmation dialog, then rebuilds the layout from the defaults in Settings. |
Rig & Stage · Settings
Settings
A small window covering the physical stage dimensions and how the visualizer renders.
Every change is written to settings.json immediately.
| Section | Control | Notes |
|---|
| Stage | Width (m) | 1–40. Default 8 m total. |
| Depth (m) | 1–40. Default 6 m total. |
| Height (m) | 0–5. Height of the stage deck itself. |
| Lights | Body size | 0.2–5.0 multiplier for fixture bodies. |
| Beam opacity | 0.0–3.0. Lower it to read overall colors, raise it for dense haze. |
| New light defaults | Height (m) | 0–20. Used for unplaced lights and layout resets. |
| Yaw | -360 to 360 degrees. |
| Pitch | -180 to 180 degrees. -90 points down, 90 up, 0 toward the audience. |
Match your real room first
Set the stage width, depth, and height before you place fixtures. Everything you
position afterwards will then translate straight to the venue.
Rig & Stage · Configs
Configs and setups
Two different scopes of save. A configuration is the whole show. A
setup is just the physical arrangement.
What a configuration contains
Stage settings, the 3D layout (placements, duplicates, towers), patched fixtures,
whether the ShowBuddy patch is included, excluded fixtures, groups, palettes, phasers,
presets and preset folders, stacks, views, the universe, the grand master, and the cue
fade time. Files land in configs/ as readable JSON.
How to save and load a show
- Open Configs from the toolbar.
- Type a configuration name and press Save.
- Press Load on any row to swap the entire show over.
- Press the trash button and confirm to delete one.
Starting fresh
- Press New show.
- Tick Remove ShowBuddy lights and presets to keep only DMXexpress fixtures.
- Tick Reset light positions to defaults if you want a clean stage.
- Press Start fresh. Stage settings and DMXexpress-patched fixtures are kept.
Setups are lighter
Setups live in the Setups section of the Inspector, not here. They
store light placement and towers only, so you can reuse a rig arrangement across
different shows.
Programming · Channel control
Channel control
The lower half of the center panel. This is the Programmer. What it shows
depends on how many fixtures are selected.
One fixture selected
You get one row per physical channel, labelled with its DMX address and channel name.
Good for dialling in a single fixture or checking exactly what a profile exposes.
Several fixtures selected
Rows collapse into channel types, each labelled with a count. Dragging the
Dimmer row moves the dimmer on every selected fixture at once, even across different
fixture models.
What is in a row
| Element | Purpose |
|---|
| Colored role badge | DIM, RED, GRN, BLU, WHT, COL, STRB, PAN, PANf, TILT, TILTf, ZOOM, or SPD. |
| Row label | Click to arm the channel for the Oscillator window. |
| Slider | 0–255. |
| 0 and 255 buttons | Hard minimum and maximum. |
| Band label | For channels with named ranges, shows what the current value means. |
Arming channels
- Click a row label to arm it. Clicking a different row replaces the armed set.
- Shift-click or Cmd-click to arm several rows at once.
- The bottom row shows
n ch armed with a small clear button.
- Open Oscillator to animate whatever is armed.
Bottom row
Blackout sets every channel of every target fixture to 0.
Full sets them to 255. Both act on the selection only.
Programming · Groups
Groups
A group is a saved fixture selection — no values. Build the ones you keep
coming back to and everything downstream gets faster.
How to build and use groups
- Select fixtures on stage or in the Fixtures panel.
- Type a name and press Store. The button is disabled with an empty selection.
- Click a tile to recall it, replacing the current selection.
- Shift-click several tiles to combine groups into one selection. The click order is remembered as a chain, shown as
#1, #2 on the tiles — that chain is what the Orders window turns into a route.
- Right-click a tile for Recall, Add to selection, Update from selection, and Delete.
Effect phase mode
The right-click menu also offers Individual fixtures or
One fixture. In One fixture mode the entire group takes a
single phase slot in phaser spreads, so a cluster of pars behaves as one unit inside a
chase instead of fanning internally. It also collapses to a single point in space, so
spatial chases sweep past the whole cluster at once. Tiles show a
1 light marker when this mode is on.
Because a folded group has to move as one, the stage will not let you select part of
it — clicking any member pulls in the rest.
Editing several groups at once
Shift-click a run of groups, then right-click any of them. Below the per-group
controls you get a Chained groups section with
All: individual fixtures and All: one light each, so a
whole route can be folded or freed in one action.
An active order overrules the mode shown here
If the running order folds lights into a multi-light step, those lights move as one
no matter what their group says. The pool tells you so: an ORDER banner
appears at the top, affected tiles read · order, and the right-click
menu offers Release from order to split the step back apart.
Groups worth having
All Movers, Front Wash, Back Truss, Odd, Even, and one group per tower. Ten minutes
of setup here saves the whole night.
Programming · Orders
Orders
An order is the path an effect travels. Without one, every spread fans out in
fixture number order, which is rarely the shape you actually want on stage.
What an order is made of
An order is a list of steps. Each step holds one light, or several lights that share a
phase and move together as a single super-fixture. A phaser hands out one phase slot
per step, in order, so the steps decide both the sequence and what counts as one
light.
How to build one from groups
- In Groups, click the first group, then shift-click the rest in the
order you want the effect to travel. Tiles number themselves as you go.
- Open Orders. The chain appears at the top as numbered pills.
- Type a name, then choose how the chain becomes steps:
- Store lights — one step per light, still sequenced group by
group. A light already placed by an earlier group is not repeated.
- Store groups as fixtures — one step per group, so each group
takes a single phase slot and moves as one light.
Store selection in patch order ignores the chain and uses the raw
stage selection instead.
Running and editing
- Click an order tile to make it the active route; click Patch order
to go back to fixture numbering.
- The tile shows how many steps it has and how many of those are multi-light units.
- Right-click for Edit, Select its fixtures,
Reverse, and Delete.
- In the editor, each step can move up or down, merge into the step
above it (folding two slots into one), split back into one step per
light, or be removed.
Overlapping groups
A light can belong to several groups, which used to make its phase ambiguous. The
active order settles it: order steps claim their lights first, in sequence, then any
One fixture group still wholly unclaimed collapses into a unit, and whatever
is left keeps patch order with one slot each.
Folded steps cannot be picked apart on stage
While an order with multi-light steps is active, clicking one of those lights
selects the whole step — and the Groups window may still describe them as
individual fixtures. The Orders window warns you when this is happening and offers
Split every folded step to undo it in one press.
Where orders show up
Phaser spreads, palette cycle spacing, and the spatial position an effect reads for
each unit. The Phasers window prints the live unit count and which route it is
following, so you can see the shape before you commit to it.
Programming · Palettes
Palettes
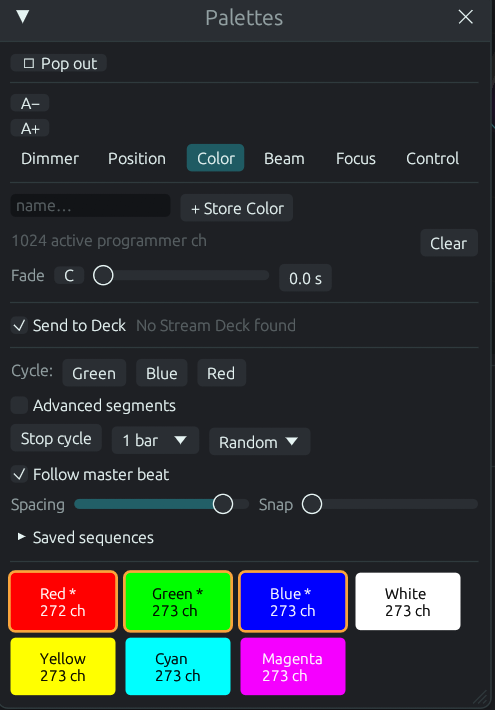
The most important pool to set up first. A palette is a saved value for
one feature, which is what lets you recall a color without disturbing where
the lights are pointing.
The six feature tabs
| Tab | Covers |
|---|
| Dimmer | Intensity |
| Position | Pan and tilt, including fine channels |
| Color | Red, green, blue, white, color wheels |
| Beam | Strobe and shutter |
| Focus | Zoom |
| Control | Speed and everything else |
How to store a palette
- Pick a feature tab, for example Color.
- Select fixtures and set the values you want in Channel control.
- Type a name and press Store Color (the button is named after the active tab).
- Repeat for the handful you will actually reuse: a few colors, four to eight positions, and a couple of dimmer levels.
Using palettes
- Click a tile to recall it into the Programmer for the current selection.
- Right-click for Recall, Add to cycle, Update from selection, and Delete.
- A blue outline means the Programmer is currently referencing that palette.
- The Fade row sets the recall crossfade:
M follows the master Transition window, C uses the custom seconds beside it, and a dash means no fade.
Why palettes are referenced
When you record a cue using a palette, the cue remembers "Color equals the Blue
palette", not raw numbers. Re-tint or re-aim the palette later and your cues follow.
References resolve when the cue fires, so re-fire a cue to pick up a palette edit — a
cue already live on stage will not change underneath you.
A normal look is three clicks
Recall a group, click a color palette, click a position palette, set a dimmer.
Programming · Gobos
Gobos
The Gobos window shows what the selected lights can project, as pictures. Click a
tile and those lights go to that wheel slot — in the visualizer the haze inside the
beam breaks into the pattern's rays, and the pool where it lands shows the projected
image, rotated by the fixture's gobo rotation channel.
How to pick a gobo
- Select some lights, then open Gobos from the toolbar. With nothing selected it lists every fixture type in the rig.
- Each gobo wheel appears as a row of picture tiles, grouped by fixture type, with the slot each light is currently on outlined.
- Click a tile to send those lights to that slot. The wheel channel lands in the Programmer, exactly like recalling a palette.
Where the pictures come from
A bundled catalogue of about 1,000 gobo images from QLC+ and the Open Fixture
Library, joined to your fixtures by maker and model. Library fixtures know theirs
automatically; built-in and ShowBuddy lights match on the model name their profile
contains. A slot with no picture projects a plain cone.
Assigning your own pictures
- Press Assign pictures, then click a tile to choose what that slot projects.
- Search the whole catalogue by name, keyword, and maker. No gobo makes the slot a plain beam; Auto forgets your choice.
- Drop your own PNGs into
fixtures/gobos/ and they appear in the picker under Custom. Dark pixels block light, bright or transparent pixels pass it — even a photo of the pattern on a dark wall works.
Per type, forever
Assignments save to gobos_user.json keyed by fixture type, so every
light of that model picks them up — now and after a repatch.
Programming · Presets
Presets
Where a palette stores one feature, a preset stores the whole look — every Programmer
value plus any running oscillations. Presets live at the top of the Inspector.
How to store and organize presets
- Build a look in the Programmer.
- Type a name and press Store look.
- Press Folder to add a folder.
- Tick drag, then drag presets onto a folder to file them, onto another preset to reorder, or onto the Presets heading to unfile them.
- Untick drag so clicks apply presets again.
- Right-click a preset for Overwrite with current look or Delete.
ShowBuddy banks
If your ShowBuddy show has preset banks, they appear in their own section below.
One bank opens at a time; clicking a preset inside applies it to the whole rig. This is
the fastest way to drop into a known look before you start editing.
Blackout all
The Blackout all button writes a black frame and releases everything:
the active preset, all running phasers, holds, any transition in progress, and the
chase. It is the panic button, and unlike the Grand Master it also drops effects.
Presets feed the Chases window
The Chases window injects a preset across the rig, so store the looks you want to
sweep before you go build a chase.
Programming · Scenes
Scenes
A scene captures what the Programmer is doing right now — including every running
wave, with its phase — and plays it back as its own mixer layer. Where two preset
recalls fight over the Programmer, several scenes genuinely run at once.
How to capture and play one
- Build something in the Programmer — a look, a rolling phaser, anything moving.
- Open Scenes from the toolbar, name it, and capture it.
- Clear the Programmer. The scene keeps running on its own layer.
- Click the scene's tile to toggle it on and off; capture more scenes and stack them.
How scenes fold together
| Merge mode | Behaviour |
|---|
| Override | Takes its channels over entirely at full level. |
| Highest | Keeps whichever is brighter, so scenes coexist instead of erasing each other. |
| Add | Sums onto whatever is already there. |
Each scene also has its own level, and the pool order sets priority — move a scene
up or down to decide who wins when two touch the same channel. Update
re-captures a scene from the current Programmer.
Why the phase is baked in
Every oscillator's phase is stored at capture time. That is what lets a wave
rolling left-to-right and one rolling right-to-left keep their own fan and genuinely
coexist, rather than arguing over one global spread.
Programming · Transition
Transition
Controls how the Programmer crossfades from its current look to a new one. Set it once
and every palette and preset recall bound to M uses it.
Core controls
| Control | Range or options |
|---|
| Duration | 0 to 20 seconds |
| Mode | Simple, Sphere scan, Radial |
| Curve | Linear or Smooth |
| Stop at current look | Aborts a running fade and captures the current output as the new base |
Spatial modes
- Set Mode to Sphere scan for a rotating plane that sweeps the new look across the rig, or Radial for an expanding shell.
- Tick Full editor to show the sphere on stage.
- Drag the sphere on stage to place it, or type X, Y, Z.
- Shift-drag the sphere to spin the Scan angle in Sphere scan mode.
- Set Blend width from 0.02 to 0.60 for a hard edge or a soft wipe.
- In Radial mode, tick Blast mode for a harder outward hit.
The M, C, and dash button
Palettes and Phasers each carry a small fade-binding button. M means the
card follows this window's master Duration, C means it uses its own custom
seconds, and a dash means no fade at all. That way one busking card can snap while the
rest of the show breathes.
Effects & Motion · Phasers
Phasers
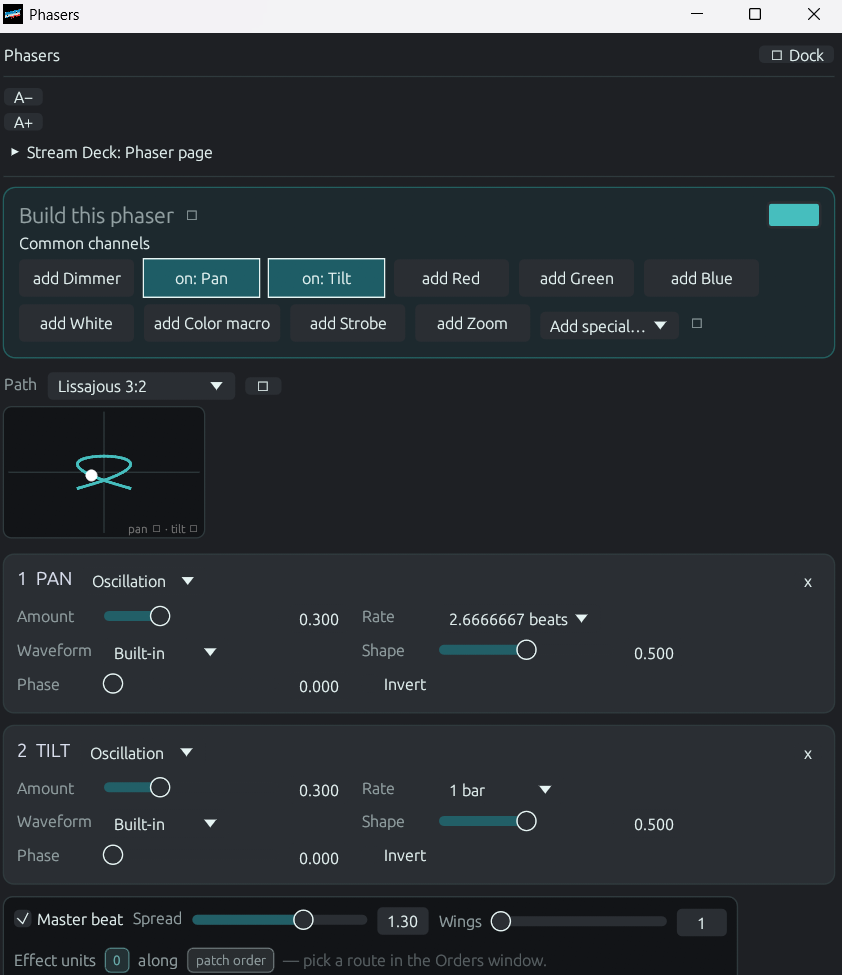
The biggest window in the app, and the heart of live effects. A phaser is built from
channel components, each of which can sit still, animate, or move to a static
value and then animate.
Building a phaser
- Select fixtures. The Common channels row shows the channels they actually have.
- Click a channel button to add it as a component, for example
PAN and TILT.
- Use Add special for rarer channels like gobo, prism, fine, or macro.
- In each component card set the mode: Oscillation, Static plus oscillation, or Static position.
- Dial Amount, pick a Rate, choose a Waveform, then shape it with Shape, Phase, and Invert.
- Press Apply, or tick Live to hear every edit as you make it.
Spreading it across the rig
| Control | What it does |
|---|
| Spread | 0.0 to 2.0. How far the phase fans out across the selection. Zero means everything moves together. |
| Wings | 1 to 8. Mirrors the spread into symmetric groups for fans and butterflies. |
| Master beat | Locks the rate to the tempo from the Beat window. |
| Clear FX | Removes all oscillators and reverts to base values. |
The four store buttons
| Button | What it saves |
|---|
| Store | The live effect, plus the fixtures it was stored with. |
| Store pose | Each selected light's current pan and tilt as a static position tile. |
| Store hold | The selection's non-zero channel values as an always-on tile that overrides presets, blackouts, and the grand master. |
| Lock fixtures | Freezes the selection exactly as it looks, forcing every channel including zeros. |
The tile pool
- Tiles are sorted into Intensity and color and Movement columns.
- Click a tile to start it, click again to stop. A white outline means running.
- Turn on Edit mode to click tiles into the editor and tweak them in place without applying or stopping anything. A yellow outline marks the tile being edited, and changes save instantly.
- Right-click a tile for Edit, Apply, Stop, Follow master beat, Bind to selection, Unbind, Overwrite with editor, and Delete.
- Give each phaser a card color so your busking pool is readable at a glance.
Gobos and effects
The collapsing Gobos and effects section lists every effect channel on
the selection with a fine value control and one chip per named band, so you can jump
straight to a gobo instead of hunting for its DMX value. Press
Store FX tile to keep the result.
Effects & Motion · Oscillator
Oscillator
Hand-built, per-channel motion. Where a phaser drives a whole effect across a
selection, the Oscillator animates exactly the channels you armed in Channel control.
How to animate a channel
- Click one or more row labels in Channel control to arm them.
- Open Oscillator and tick Enabled.
- Set Amount as a percentage of the channel's range.
- Pick a Speed: Free, 4 bars, 2 bars, 1 bar, 1/2, 1/4, or 1/8.
- Shape the wave with Shape, and flip it with Invert.
- Raise Offset to fan the phase between armed channels — 0.25 gives 0, 0.25, 0.5, 0.75, which makes a chase.
Global engine controls
While anything is animating you get Master speed (0.1 to 4.0),
Tempo in BPM, a Free speed slider for oscillators set
to Free, and Stop all, which renders the current animated frame and
freezes it as a static look — a neat way to capture a moment mid-effect.
Custom waveforms
- Open the Custom waveforms section and press New.
- Drag points in the editor canvas to shape the curve. End points stay locked horizontally.
- Double-click to add a break point.
- Right-click a section for Point to point, Curved, or Square / hold.
- Set Travel to Forward or Boomerang, and Stripes to repeat the drawn wave up to 16 times per cycle.
- Name it, press Save waveform, then select it in any Waveform dropdown — including inside Phasers.
Effects & Motion · Chases
Chases
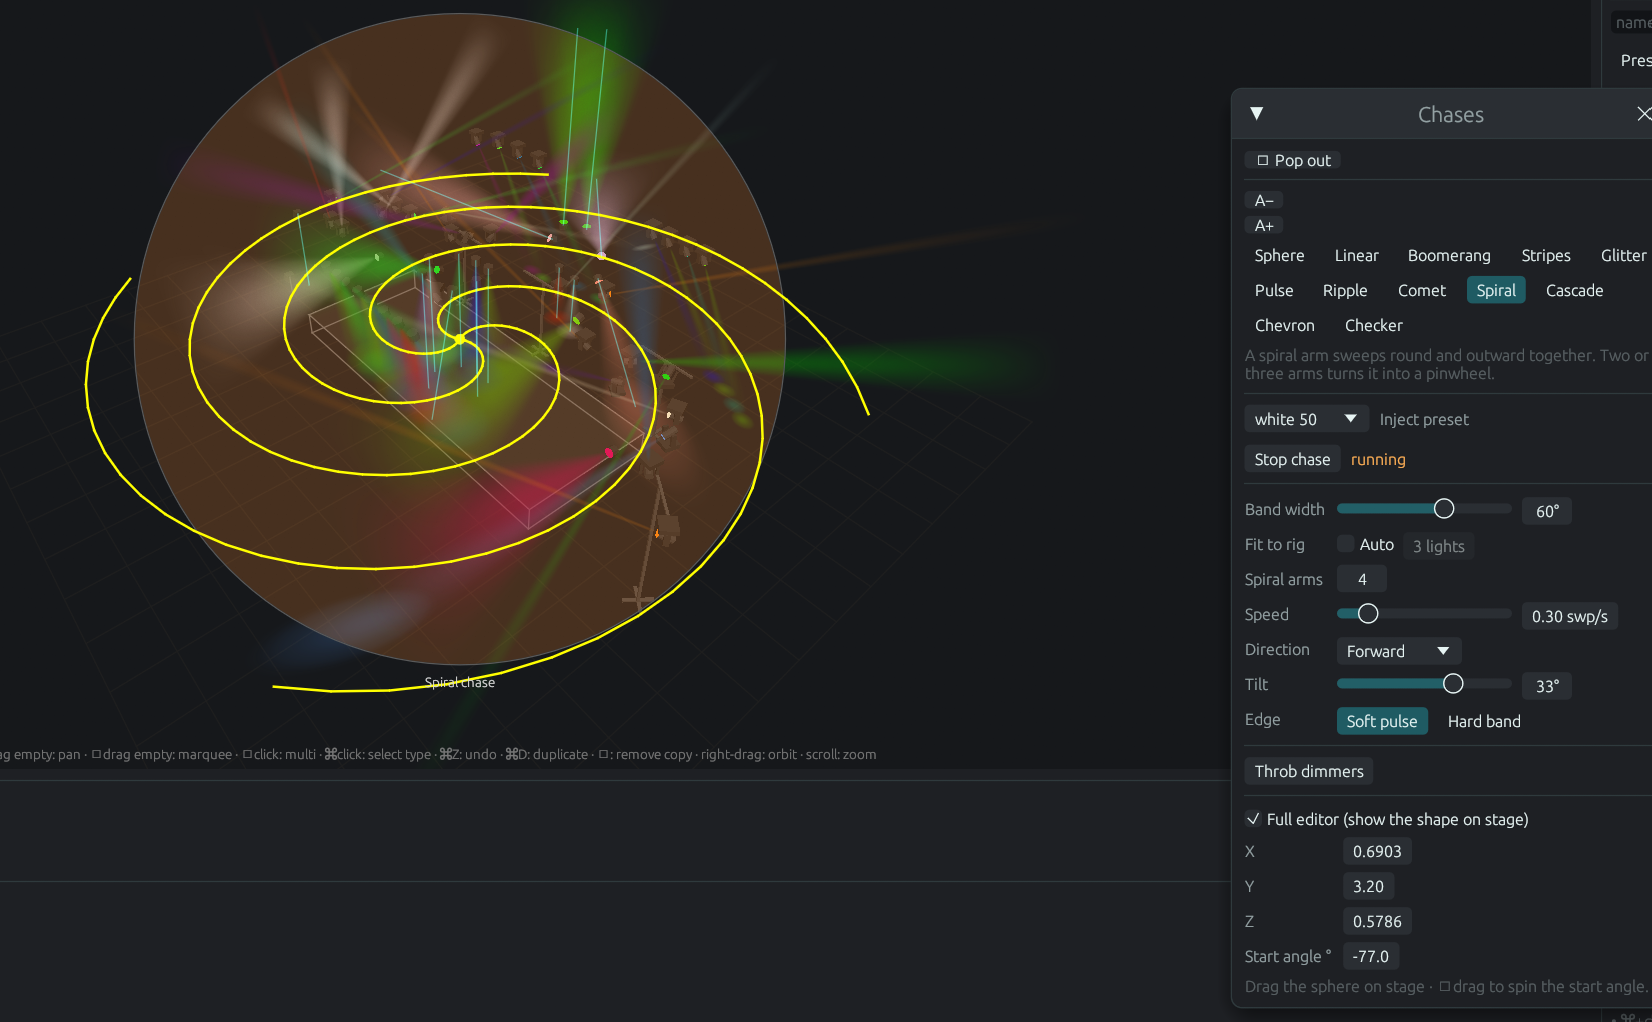
Non-destructive moving overlays. A chase takes a preset and injects it across the rig
in a moving shape, on top of whatever else is running.
The twelve shapes
| Kind | Behaviour |
|---|
| Sphere | A rotating band that sweeps the preset around the rig. |
| Linear | A band that travels in one direction and repeats. |
| Boomerang | The same band, bouncing back and forth. |
| Stripes | Multiple evenly-spaced bands at once, from 2 to 32. |
| Glitter | Random sparkles across the rig, with a density control. |
| Pulse | A single one-shot sweep you fire by hand. |
| Ripple | Rings expanding out from the chase origin, like a stone in water. |
| Comet | A bright head dragging a decaying tail behind it. |
| Spiral | A spiral arm sweeping round, angle and radius together. |
| Cascade | A wave falling down the rig's height, whichever way it is aimed. |
| Chevron | A mirrored pair of bands opening out from the middle of the rig. |
| Checker | The rig split into banks that flip on and off against each other. |
How to run a chase
- Store a look as a preset first — the transport buttons stay disabled until a source preset is picked.
- Choose it in the Inject preset dropdown.
- Click a shape chip.
- Set Band width, Speed, Direction, and Tilt. Stripes adds a Stripe count.
- Choose an Edge: Soft pulse for a gentle wash or Hard band for a crisp cut.
- Press Start chase, or Send pulse for the one-shot kind. Press Stop chase to end it.
Positioning and busking
Tick Full editor to show the chase sphere on stage, then drag it into
place or set X, Y, Z and
Start angle numerically. Shift-drag the sphere to spin the start angle.
Throb dimmers surges every dimmer to full and decays back over half a
second. Mash it with the kick drum.
Effects & Motion · Palette sequences
Palette cycles and sequences
Inside the Palettes window is a small engine that rolls through a list of palettes.
It is the fastest way to get moving color across a rig without building a phaser.
How to build a cycle
- Shift-click two or more palette tiles. They appear in the Cycle row; click one there to remove it.
- Pick a rate: 4 bars, 2 bars, 1 bar, 1/2, 1/4, or 1/8.
- Pick a pattern: Wave rolls across the rig, Wings mirrors it, Random scatters it.
- Press Cycle to start and Stop cycle to end it.
Shaping it
| Control | Effect |
|---|
| Spacing | 0 means every light changes together; 1 spreads the whole cycle across the rig. |
| Snap | 0 is a smooth crossfade; 1 is a hard snap on the step. |
| Follow master beat | Locks the cycle to the tempo from the Beat window. |
| Advanced segments | Shows a weighted color bar. Shift-click can add the same palette more than once, and you drag a band's right edge to change how long it holds. |
Saving a sequence
- Open Saved sequences.
- Name it and press Save. You need at least two palettes in the cycle.
- Press Folder and turn on Drag mode to file sequences into folders.
- Click a tile to load and start it. Right-click for Load without starting, Overwrite with current cycle, Follow master beat, Move to, and Delete.
Effects & Motion · Audio in
Audio in
Pick any audio source the computer can hear, watch its spectrum, let the beat tracker
press TAP for you, and draw trigger bands on the graph — when the bass crosses this
line, throw this palette at that group.
Picking a source
- On Windows, every output device is offered as a System audio loopback source — play a track and light it, no cabling.
- Microphones and other inputs work on every platform.
- On macOS and Linux, capturing system audio needs a virtual device such as BlackHole or a monitor source.
Following the beat
The analyser folds a live FFT into 64 log-spaced bands and feeds spectral flux into a
predict-and-correct beat tracker. Each detected beat becomes a tap on the existing
beat machinery — the tracker is a very patient drummer pressing the TAP button — and
a confidence readout says how periodic the music actually is. Everything that follows
the master beat follows the band.
Band triggers
- Draw a band on the spectrum graph, or start from a named range: Sub, Bass, Low-mid, Mid, High-mid, Presence, Air.
- Set the threshold line. The trigger fires when the band's energy crosses it.
- Pick what it paints: a palette or a native preset, aimed at a group or the whole rig.
- Choose how it fires: Gate holds while the band is above the line with attack and release shaping, One-shot fires on each crossing then decays, and Follow tracks how far above the line the band sits.
- Pick a merge mode — Override, Highest, or Add — the same choices scenes use.
Level-independent by design
The spectrum is normalised against a slowly decaying reference peak, so the graph
and your triggers behave the same at rehearsal volume and show volume. Audio settings
stay machine-local on purpose — device names differ per computer.
Effects & Motion · Beat
Beat
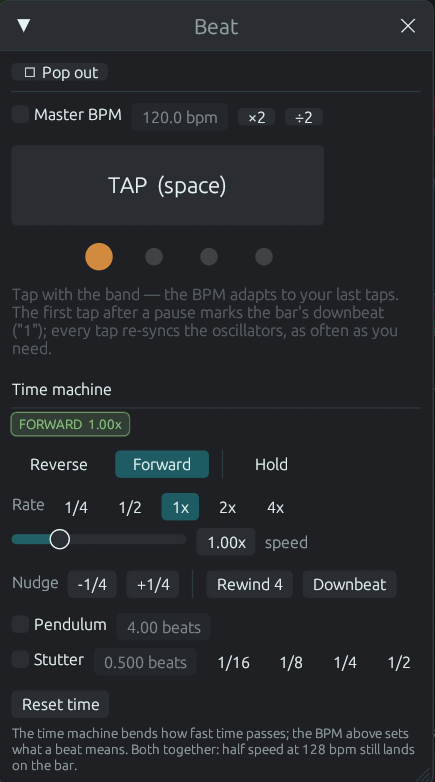
The master clock. Turn it on, tap along with the band, and every card that opts in —
phasers, palette sequences, oscillators on musical rates — locks to the song.
How to sync to a band
- Open Beat and tick Master BPM.
- Tap the big TAP button, or press the space bar, on the beat — or open Audio in and let the beat tracker tap for you.
- Watch the four-circle bar indicator. The orange circle is beat one.
- Use x2 or ÷2 if the detected tempo lands on the wrong subdivision.
- Pause for more than two and a half seconds, then tap again to reset the downbeat.
How tapping is interpreted
- Taps more than 2.5 seconds apart start a fresh run.
- Up to nine taps shape the tempo, which is clamped between 30 and 300 BPM.
- The first tap of a run marks the bar downbeat; later taps nudge to the nearest beat.
- Drift is applied to the live look, any running transition, the chase, and the palette cycle when it is following the master beat.
The time machine
Below the tap controls is a set of transport tools that bend the flow of animation
time itself. Everything on a clock — phasers, oscillators, chases, palette cycles
— follows, and status pills across the top always say what is currently in force.
| Control | What it does |
|---|
| Reverse / Forward | Runs every effect backwards or forwards. Sweeps retrace their path, chases travel the other way down the rig. |
| Rate | Scales the speed of time. Presets for 1/4, 1/2, 1x, 2x and 4x, plus a free slider. |
| Hold / Resume | Freezes the transport without losing phase. Resuming picks up exactly where it stopped. |
| Nudge | Shifts every clock by a quarter beat either way — the fix when an effect is sitting just off the groove. |
| Rewind 4 / Downbeat | Jumps the clocks back four beats, or snaps them onto the bar. |
| Pendulum | Swings time forward and back over a set number of beats, so effects breathe in and out instead of looping. |
| Stutter | Repeatedly re-triggers a short slice of time — a sixteenth, eighth, quarter or half beat — for a hard rhythmic chop. |
| Reset time | Puts everything back to forward at 1x with no pendulum or stutter. |
Space bar works anywhere
As long as the Beat window is open, free-fly mode is off, and no text field has
focus, the space bar taps. You never have to aim at the button mid-song.
Playback · Stacks
Stacks
A stack is a cue list: an ordered set of looks you step through with Go. This is
theatre-style playback, and it is where tracking lives.
How to build a stack
- Press New and rename the stack in the text field.
- Build a look in the Programmer: a group, some palettes, a dimmer, maybe a phaser.
- Set Fade in seconds.
- Press Store cue. The button is disabled while the Programmer is empty.
- Change the look and press Store cue again for cue 2, and so on.
Tracking
A cue records only the channels you touched. Channels you did not touch track
through from earlier cues, exactly like a real console. That keeps cues small and makes
edits painless: change a color in cue 2 and every later cue that never sets a color
follows.
The record mask
The Record row has one toggle per feature: Dimmer, Position, Color,
Beam, Focus, and Control. Turn off Position to store a color-only cue. All toggles on
records everything.
Playing a stack
| Control | What it does |
|---|
| Go | Fades to the next cue, wrapping at the end of the list. |
| Row play button | Jumps straight to that cue. |
| Cue grid | Number, editable name, per-cue fade time, jump, and delete. The current cue's number is bold green. |
| Clear prog | Empties the Programmer so the stack's output actually shows through. |
| Delete list | Removes the whole stack. |
Palette references survive
Channels linked to a palette are stored as references rather than raw numbers, and
resolve when the cue fires. Edit the palette, re-fire the cue, and the cue updates.
Playback · Decks
Decks
The executor bar across the bottom of the screen. This is your hands-on surface for
running the show live.
Grand Master
One vertical fader on the left, labelled GM, scaling every dimmer in
the rig with a percentage readout underneath. Pull it down for a quick fade to black.
Stack strips
- Each strip shows the stack name, turning green while it plays.
- Below it, the current cue name, or a dash when the stack is off.
- Ride the vertical Master level fader to fade that whole cue list in and out.
- Press Go to fire or advance cues.
- Press Off to release the stack so it stops outputting. It is disabled unless the stack is playing.
Grand Master only scales dimmers
Fixtures with no dimmer channel — raw RGB pars, for instance — will not dim from GM.
Use a dimmer palette or the channel sliders for those.
Prefer physical keys?
Plug in an Elgato Stream Deck and busk presets, palettes, phasers, and chases from
real keys — see Stream Deck.
Playback · Stream Deck
Stream Deck
Plug in any Elgato Stream Deck over USB and DMXexpress takes it over as a control
surface — no Elgato software or plugins involved. Every key is drawn live by the app
with its own color, label, and artwork. Whichever deck answers first is used, and if
it is unplugged mid-show it reconnects by itself.
Turning it on
- Open Palettes and check Send to Deck — it is on by default, and the detected model is named beside it.
- If another program is holding the deck, close it so DMXexpress can reach the device.
- Turn the Mode knob to cycle through the four pages.
The four pages
| Page | What the keys do |
|---|
| Presets | ShowBuddy General banks, OFF, and the rainbow looks — a whole look at one press, brightest first. |
| Palettes | Colors picked into the palette cycle. The Page knob flips to Gobos — every gobo in the rig — and to Effects pages listing every other wheel, prism, and effect. |
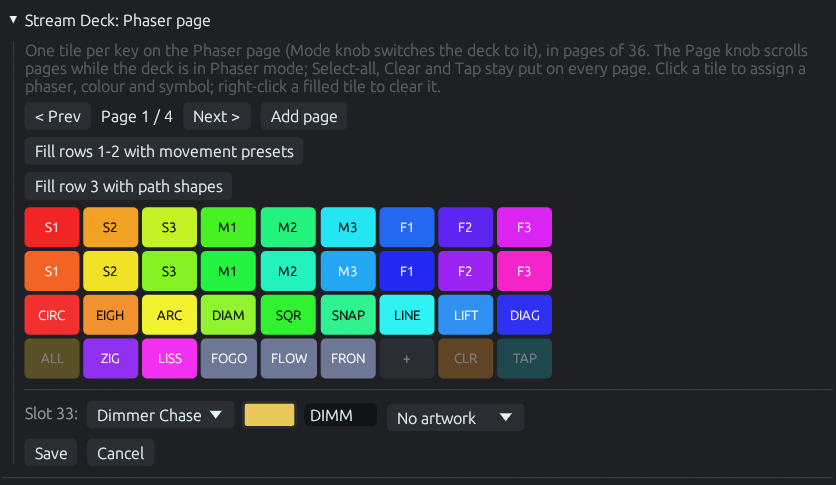
| Phasers | Your own pages of phaser keys, 36 slots per page, toggled on and off per key. |
| Chases | The twelve chase shapes plus transport — pick the inject preset, start, stop, and fire pulses. |
The knobs and the touch strip
| Knob | What it does |
|---|
| Dimmer | Rides the grand master. |
| Beat | Taps and trims the master tempo. |
| Mode | Cycles the four pages. |
| Page | Flips the Palettes sub-pages, or scrolls your phaser pages. |
| Programmer knob | Twist to nudge the highlighted channel on every selected light; press to step to the next channel. Channels dialled this way sit on an encoder layer painted over the mix until you clear them. |
On the Stream Deck Plus XL the touch strip is a live readout: the grand master with a
level bar, the BPM pulsing on the beat, the current page, and the programmer knob's
channel and value.
GM86%
BEAT122 BPM
MODEPALETTES 2/4
PAGEGOBOS 2/4
Building your phaser pages
- Open Phasers and find the deck section: one tile per key, in pages of 36.
- Assign a phaser to a slot, then give the key its own color, label, and artwork — bullseye, stage light, wave, burst, rainbow, and more.
- Turn the Page knob to scroll pages while the deck is on the Phaser page.
- Pages persist in
phaser_deck.json, so your busking surface survives restarts.
Every model works
Original, Mini, MK2, XL, Neo, Plus, and Plus XL are all recognised. The key grid
adapts to whatever the deck has; the touch strip and knobs light up on the Plus
models.
Playback · Command line
Command line
A single text box at the very bottom. Type a verb, press Enter. Much faster than the
mouse once the vocabulary is in your fingers. Numbers are 1-based and in pool order.
| Command | Aliases | What it does |
|---|
clear | cl, c | Release the Programmer |
black | blackout, bo | Release every stack and clear the Programmer |
full | — | Grand Master to 100 percent |
gm 80 | — | Grand Master to a percentage from 0 to 100 |
go | — | Go on the currently selected stack |
go 2 | — | Go on stack number 2 |
off | — | Release every stack |
off 2 | — | Release stack number 2 |
store | — | Store a cue into the current stack |
cue 3 | — | Jump the current stack to cue position 3 |
group 1 | grp, g | Recall group number 1 |
Anything unrecognised is reported in the Log, as are usage errors such as
Usage: gm 0-100. There is no command history or autocomplete.
A busking sequence
g 3 to grab a group, build a look, store, go,
then c to hand control back to playback.
Playback · Views
Views
Named snapshots of your workspace. A view captures both the open windows and the stage
camera position, so you can flip between a programming desk and a playback desk
instantly.
How to save a view
- Arrange the windows you want open and park the stage camera where you like it.
- Type a name next to Name.
- Press Save.
- Click the view's button later to restore both the layout and the camera.
- Press the trash button to delete a view.
What a view captures
The camera snapshot and fly-mode state, plus the visibility of Art-Net, Transition,
Chases, Groups, Orders, Scenes, Audio, Palettes, Phasers, Stacks, Decks, Command,
Log, and Oscillator.
Beat, Gobos, Patch, Configs, DMX monitor, Settings, and the Views window itself are
not part of a view, so utility windows stay where you left them.
Two views to start with
A Program view with Palettes, Phasers, and Stacks open, and a
Playback view with Decks, Stacks, and the command line.
Output & Fixes · Art-Net
Art-Net output
DMXexpress streams two contiguous DMX universes over Art-Net at roughly 40 frames per
second. The Art-Net panel docks to the top of the window and is where you choose the
destination.
How to get output running
- Set Universe in the top toolbar. Slots 1–512 go there, 513–1024 to the next universe.
- Press ArtPoll to broadcast a discovery packet.
- Click a discovered node row to unicast to it. Each row shows the IP address, the short name, and the long name underneath.
- Click Broadcast 255.255.255.255 to go back to broadcasting to everything.
- For a node that does not answer ArtPoll, type its address into Manual target IP and press Use.
A valid manual address is confirmed in the Log; an invalid one reports
Invalid IP address. While no nodes have answered, the panel simply reads
Searching.
Before you connect to a real rig
Confirm the interface, the universe, the patch, and the Grand Master position. Do not
rely on DMXexpress as the sole safety mechanism for a live production.
Output & Fixes · DMX monitor
DMX monitor
A live view of all 1024 output channels, plus a per-channel override so you can test
wiring end to end without touching your show.
Reading the list
- Each row is one DMX slot: address, a level bar, the numeric value, an override checkbox, and the owning fixture's name.
- The level bar is green normally and orange while that channel is overridden.
- The header reports either
No overrides active or a warning with the override count.
How to test a fixture
- Open DMX from the toolbar.
- Scroll to the address you want. The fixture name on the right helps you orient.
- Tick its checkbox. The channel is forced to 255 on the wire, on top of everything else.
- Drag the override value to test a specific level.
- Press Clear all to drop every override when you are done.
Overrides outrank everything
An override sits above cues, phasers, holds, and the Grand Master. Always clear them
before you run a show.
Output & Fixes · Freeze & blackout
Freeze and blackout
Three different ways to stop, each with a different scope. Knowing which one to reach
for is the difference between a clean save and a dead stage.
Freeze
The FREEZE button in the top toolbar holds the exact current output and
pauses every oscillator, transition, chase, palette cycle, cue fade, and timed ramp.
UNFREEZE resumes every one of them at the same phase, because the
paused duration is added to each clock rather than reset. Use it to hold a look while
you go fix something.
Blackout all
The Blackout all button in the Inspector writes a black frame and
releases the active preset, all running phasers, holds, the transition, and the chase.
This is the full stop.
Command line blackout
Typing black or bo releases every stack and clears the
Programmer. Playback stops, but stage effects owned by the Inspector are untouched.
Grand Master
Pulling GM to zero scales every dimmer to nothing but leaves everything running
underneath, so pushing it back up restores the show exactly. Note that fixtures with no
dimmer channel, and phaser hold or lock tiles, ignore it.
| Action | Stops effects | Stops playback | Reversible |
|---|
| Freeze | Pauses | Pauses | Yes, in phase |
| Grand Master to 0 | No | No | Yes |
black command | No | Yes | Re-fire cues |
| Blackout all | Yes | Partly | Rebuild the look |
Output & Fixes · Log
Log
A small floating window that narrates everything the app does. It is display-only by
design: no filters, no severity levels, no clear button.
What lands in it
- How many fixtures loaded from the patch, and any patch warnings.
- Store and recall confirmations for groups, palettes, presets, and cues.
- Command line feedback, including usage errors and unknown commands.
- Art-Net target changes and invalid IP addresses.
- View changes.
How to use it
- Click Log in the top toolbar.
- Scroll back through the history; the view auto-follows new entries.
- Use
A- / A+ to change its text size.
Keep it open while learning
Every action you take is described in one line. It is the fastest way to understand
what a button actually did.
Output & Fixes · Files
Files on disk
Every part of your show is plain, readable JSON in the working directory. Nothing is
locked in a binary format, so you can read it, diff it, and put it in version control.
| File | Contents |
|---|
groups.json | Your groups |
palettes.json | Your palettes |
phasers.json | Your phasers |
sequences.json | Saved palette sequences |
presets.json | Your stored looks and preset folders |
stacks.json | Your stacks and cues |
views.json | Your saved views |
patch_user.json | Fixtures patched inside DMXexpress |
stage_layout.json | Light placement, duplicates, and towers |
settings.json | Stage dimensions and visualizer settings |
configs/ | Whole-show configurations |
setups/ | Saved stage arrangements |
Easy to extend
Because it is all readable JSON, it is straightforward to generate a new stage
layout or a batch of fixture profiles with a script or an AI assistant, drop the file
in, and rehearse on it tonight.
Output & Fixes · Plugins
Plugins
A plugin is one script file that extends the console: it can paint its own effect
layer under the programmer, open a window of its own controls, or re-tint the whole
theme. Scripts are sandboxed — no file, network, or system access, and runaway loops
are stopped with an error instead of a hang.
Installing one
- Download a
.rhai file — the plugin marketplace lists reviewed ones.
- Open Plugins from the toolbar and drag the file onto the window. Or press Open folder, copy it in, and press Reload all.
- Tick the plugin to enable it. Untick to stop it instantly.
The window, row by row
| Control | What it does |
|---|
| Checkbox | Enables the plugin: its layer starts mixing, its theme applies, its window becomes available. |
| Window | Shows the plugin's own control window, when the script declares sliders and buttons. |
| Reload | Recompiles that script from disk — edit, save, reload, hear the difference. |
| Remove | Deletes the script file, after a confirmation. |
| Get plugins | Opens the marketplace in your browser. |
How plugin layers sit in the mix
Plugin layers render with the scenes, underneath the programmer — so whatever a
script paints, your own programming always wins on the channels you are holding.
Each script picks how it folds in: mix takes its channels over,
highest keeps whichever is brighter, add sums on top.
Errors
A script that fails shows its error in red in the Plugins window, and the failing
hook is parked so it cannot spam. Fix the file and press Reload.
print("...") output lands in the Log window.
Write your own
The developer section of the marketplace documents
the whole format — it is one file with four optional functions, and the three
bundled plugins double as worked examples.
Output & Fixes · Troubleshooting
Troubleshooting
The problems people actually hit, and the one-line fix for each.
My playback does nothing
The Programmer is still holding those channels. Press Clear prog or
type clear. Check the active-channel count reads zero.
My palette edit did not change the cue
Palette references resolve when a cue fires. Re-fire the cue with Go or
its row play button.
A cue is missing something I set
Store only records channels you actually touched, filtered by the
Record mask. Confirm you moved that channel and that its feature toggle
was on.
Some fixtures will not dim from the Grand Master
GM scales dimmer channels only. Raw RGB fixtures have no dimmer, so use a dimmer palette
or drive the color channels down instead.
A fixture is stuck on and ignores everything
Check for a phaser hold or lock tile still running, and
check the DMX monitor for a leftover channel override. Both outrank
normal output.
Nothing reaches my node
Confirm the universe in the toolbar, press ArtPoll and select the node,
or set a manual target IP. Verify the fixture's address falls inside slots 1–1024,
and read the Log for the last target change.
Everything is moving but nothing responds to edits
Check whether FREEZE is engaged in the toolbar. The button reads
UNFREEZE and turns blue while output is held.
A fixture I patched vanished
Open Patch. It may be in the Removed list, or
Include ShowBuddy patch may be unticked. Press Restore
all to bring excluded fixtures back.